In the Hexihub system, the invoicing process flows like this:
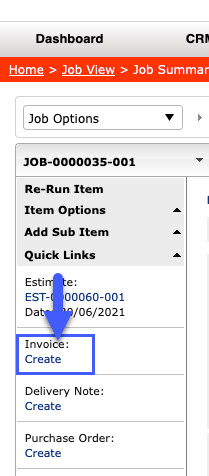
1. In the Quick Links panel on the left side of the main summary Job screen.
- Click "Create" to create a new invoice, see below:
2. In the pop up select whether you want to archive the job when the invoice is created, see below:

3. You will be taken into the new invoice
- Check the costs, GP, and final selling price, and adjust the sub total if you wish
- Check the descriptions on the right side of the screen
- Hover on the Invoice Options drop down on the left side of the screen and select Print/Email, see below:

4. The PDF invoice opens on screen for you to check
- When satisfied, select the Email tab in the grey tabs on screen, and email the invoice from the system, see below:

- If not satisfied, select Close and configure the invoice screen further then select Print/Email again.
- Once the invoice has been emailed, change the Status in the Invoice to be "Sent To Customer".
If you have any further questions, please contact Support.